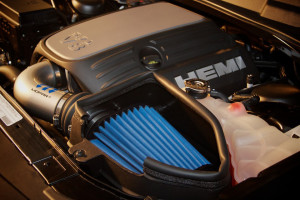
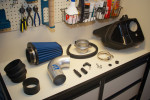
Installing this Mopar Cold Air Intake (77070044) is a fairly simple process. Some installers mention taking as little as 30-minutes but I found the entire process took a solid 2-hours. This is because I took my time and laid all the parts out inspecting slowly as the install process moved forward. Below are the instructions for installing the intake with a few added notes as to what I experienced with my Challenger.
This page describes the process of how I installed an accessory on my car. Always use the manufacturers instructions and or consult a professional in the event you need assistance.
1) GETTING STARTED
- a) Make sure vehicle is parked on a level surface.
- b) Set parking brake.
- c) Disconnect negative battery terminal. Do not close the truck otherwise you will have to climb in from the cab and release the emergency cord.
- d) If the engine has run within the past two hours let it cool down.
2) REMOVING THE STOCK AIR INTAKE SYSTEM
- a) Remove the engine cover by pulling straight up. Be careful not to hit your hand in the back against the frame when pulling up as it will pull the skin off your knuckle.
- b) Release the wire harness clip to the IAT (intake air temp) sensor by gently pressing the tab.
- c) With the tab depressed, detach the clip from the IAT sensor. Do not remove the sensor at this time.
- d) Loosen the hose clamp at the throttle body.
- e) Remove the M6 air box mounting bolt. This bolt will be reused later.
- f) Detach the valve cover breather hose from the air box.
- g) Remove the three M6 screws securing the air box lid and remove the lid with the air intake hose. Be sure the screws don’t get loose on the floor otherwise you will get a flat.
- h) With the air box lid and air intake hose removed the air box base can then be removed from the engine bay. Note: Pull up to release the base from the inner fender.
- i) Remove the rubber grommet and rubber bushing from the factory air box.
3) INSTALLING THE MOPAR COLD AIR INTAKE
- a) When installing the MOPAR Cold AirIntake System, DO NOT completely tighten the hose clamps or fasteners until instructed to do so later in these instructions. Check to see that the inside of the inlet tubes and air filter are clean and free from any foreign objects and/or obstructions.
- b) Install supplied aluminum threaded boss to the bottom of the MOPAR Cold Air Box with supplied M6 bolt.
- c) Assemble the filter adaptor tube to the MOPAR Cold Air Box with the supplied M6 bolts and apply the blanking plug to the hole next to the filter adaptor.
- d) Install the rubber grommet removed from step 2 i) onto the tab on the MOPAR Cold Air Box.
- e) Install the rubber bushing removed from step 2 i) onto the aluminum threaded boss installed in step 3b).
- f) Lower the assembled MOPAR Cold Air Box into the inner fender. Note: Make sure the bottom of the air box and rubber bushing is completely seated into the inner fender.
- g) Secure the MOPAR Cold Air Box to the core support with the M6 bolt removed from step 2 e).
- h) Assemble the supplied breather hose to the hose adaptor fittings and install it to the air filter as shown.
- i) Attach the air filter to the adaptor tube in the MOPAR Cold Air Box and slightly tighten the hose clamp. Note: The vent hose will go through the side of the air box.
- j) Attach the factory valve cover breather hose to the fitting from the air filter.
- k) With the valve cover breather hose connected make sure there is ample clearance between the hose and A/C line.
- I) Insert the supplied grommet into the MOPAR air intake tube.
- m) Twist and remove the IAT sensor from the factory intake hose and remove the O-ring with the sensor. Note: Do not discard the O-ring. Be careful when removing the sensor from the old factory intake hose. You need to turn the sensor counter clockwise and lift a small tab simultaneously or else you could break it.
- n) Insert the IAT into the grommet on the intake tube. Note: The orientation of the sensor probe inside the tube does not affect performance. Directions mention orientation doesn’t matter but I placed the sensor back the same way it was with the stock intake tube. This helps the clip attach as clearance is limited and wire tension is tight.
- 0) Attach the supplied hose adaptor and hose clamps to the intake tube.
- p) Attach the straight hose adaptor to the throttle body. Note: Only tighten the hose clamps when desirable tube placement is achieved. Before attaching hose adaptor, remove the factory clamp on the engine body. This clamp isn’t needed as it was used to support the factory hose assembly which has now been removed.
- q) Attach the elbow hose adaptor to the air box. Note: Only tighten the hose clamps when desirable tube placement is achieved.
- r) Connect the IAT sensor harness to the IAT sensor.
- s) Install the supplied rubber edge trim on the MOPAR cold air box.
4) RE-ASSEMBLE THE VEHICLE
- a) Inspect the engine bay for any loose tools and check that all fasteners that were moved or removed are properly tight.
- b) Re-check clearance for all hoses and tighten all hose clamps.
- c) Reconnect negative battery terminal. Upon connecting the battery the car will show codes and security warning in the dash and navigation screen. This will go away after a few seconds. With the battery being disconnected for 2-hours you will loose all programed radio stations, etc. Basically the system will be like it was from the factory.
- d) Start engine. Let car idle for 3-minutes. Perform a final inspection and take the car for a ride around the neighborhood to show off your new install and to confirm the intake is working properly.


I am waiting for my 2013 dodge challenger 27m to be delivered 01/09/13 @ 1:00pm. When I take possession of my challenger and after first 500 miles I will order a RAM air kit that includes CAI. That will be installed using the stock hood scoops… forcing air thru the double scoops instead of blowing downward on the back side of the hemi engine. It’s only $340.
Congrats on your new Challenger. Let me know how the RAM air kits install goes. Price seems reasonable.
How much more HP do think you may be getting out of the mopar cai?
Haven’t confirmed but the car feels a tad quicker. Other installers state it add’s 10 more horses and 10 more pounds of torque. So far I feel like my gas milage isn’t as good as it used to be. Some forums state it takes a few hundred miles for the air sensor to dial the new air temp in.