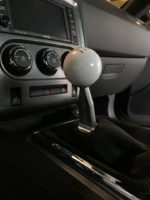
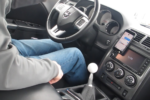
Finally pulled the trigger and ordered the shifter. Went with the Barton Industries Brushed Aluminum w/ Barton Engraved Flat Stick and White Shift Knob (both no color). My 15-year old son was very enthusiastic about getting in on the action so we both dove in “playing to win” and completed the job with no complications. Unfortunately it was raining so the test drive wasn’t ideal but I can tell you this shifter is amazing. The 44% throw reduction is real as advertised and the centering springs does help mask the slop that in the gear selector rod which gives it a perfect 2-3 shift every time. I found 1-4 very easy to use with 5th being a tad hard to get just right, however once you loose your shifting memory of the stock shifter you adapt quickly. There is more road noise than the stock shifter but some of that noise can be removed with attention to the rear bracket. See note below…
NOTE: There was some confusion as to how the rear bracket should be installed so in post I called Barton and spoke to Joe about which way the bolts should face on the rear bracket. Turns out either way is right, it’s all bout how much noise there is in post of the install. He said “Always start with the bolts facing forward. Then if you have excessive noise put it facing rear. If noise persists then loosen the rear bracket pan bolt and wiggle the shifter to get it to sit in a more neutral position, then tighten the rear bracket pan bolt back up. If noise persists we will send out a special foam piece that will finish off the job.” Additionally he stated “Putting this shifter on 5 different cars with the same make and model will give 5 different results. The trick is to not install the shifter stiff, but wiggle it around during and after you tighten the bolts. This will allow the shifter to fall into the most neutral and loose position giving the best performance and low noise result.”
Also for those who are interested in putting a Speed Dawg ball on your Flat Stick the thread size is 12mm x 1.25 and if you want to buy a different color Flat Stick with engraved color it’s $80 shipped with a matching ball.
Buy a Barton Shifter on Amazon
Buy a Speed Dawg Shift Knob on Amazon
2009-14 Challenger Install – Video:
2009-14 Challenger Install – Manual:
TOOLS NEEDED:
Phillips Screw Driver
10mm, 8mm, and 1/2″ Socket
12″ Extension
10mm Ratchet Wrench
19mm Wrench or Crescent
Interior Trim Tool
and Sil-Glyde Grease
-
-
- Carefully using a pry tool to remove your boot you will then need a 1/2” socket wrench to remove the bolts holding your handle in place.
- You will need to remove the rubber insert in your middle console followed by using your 12” extension with a 8mm socket.
- Once you have removed your 4 8mm bolts carefully lift up on your cup holders working your way to the dash board. You have 2 electrical clips that need to be removed.
- Make sure to remove your 3rd electrical clip before using your Phillips screwdriver removing 2 screws on the front of the console.
- Now that your 2 screws are removed gently slide your entire console back enough to lift your console to reach your last clip located by your cup holder.
- With the console now removed lift up on your air duct carefully pulling it out of your dash.
- Removing your clip ops your rubber boot will allow you to remove your boot giving you access to your floor pan.
- You will need to remove your 6 10mm nuts fastening your floor pan to your car.
- When you have fully removed the 6 nuts you will need a 13mm to remove the nut holding your bracket in place allowing you to remove your floor pan giving you access to your shifter.
- There is a clip pin on each side of your shifters legs securing the shifter to the transmission that need to be removed.
- With the 2 pins removed you now need a 10mm wrench or a socket to remove your linkage bolt on your drivers side. When the bolt is fully removed you are now able remove your shifter.
- Before installing our Barton shifter make sure that our shaft will slide into your linkage. If this does not fit see step ??
- The first step to installing the Barton shifter is to slide the legs of the shifter in place allowing you to reinstall the clip pins locking the shifter to the transmission.
- Once your 2 pins are in place pull your linkage to the back of your car giving you more room to pull your linkage up on our shaft to reinstall the linkage bolt.
- Make sure that your get the bolt thats holding the shifter and the linkage together fully tightened.
- Now slide your rear bracket on the shifter with the screws facing the front of the car.
- Before reinstalling your floor pan its now time to put the Barton boot in the floor pan. Once the boot is on place put grease on the inner diameter of the boot.
- Carefully putting the top of the shifter through the floor pan you have to line up the threads of your bracket through the hole of your floor pan allowing you to start the nut keeping the bracket in place.
- Once you started the nut on the bracket you need to line up your 6 holes on the floor pan with the 6 threads secured to the car allowing you to drop the floor pan in place.
- Once the floor pan is in place take your 6 10mm nuts and fully tighten your floor pan to the body of the car.
- Use your 13mm to snug your bracket to your floor pan. You should notice that as you tighten your bracket your shifter is being pulled up evenly through your boot.
- Using your pry tool fully secure the boot in the grooving of the shifter locking it in place.
- When your boot is in place go back to your bracket and finish tightening it to the floor pan. Note that you don’t want to over tighten.
- Now reinstall your rubber boot cover putting your clip back in place.
- Take the air duct and carefully reinstall it making sure you do not pinch any wires.
- Grab your console and carefully slide it in place lining up your screw holes. Once everything is in place put your 2 electrical clips back in place followed by your 2 Phillips screws.
- Make sure your second wires placed under the cup holder.
- Take your 8mm socket with your 12” extension and tighten up your 4 bolts.
- Once your 4 bolts are fully tightened now take your rubber insert and put it back in place.
- Reinstall the upper portion of the console and be sure too reattach the 2 wire connections.
- Take the 4 Hex bolts provided and finger tighten your mount.
Directions below are for the Flat Stick install. See video at 12:01 if you want to install the OEM pistol grip.
- Slide your flat stick inside of your handle mount. When your flagstick is in place take your 2 bolts provided and tighten the flat stick to your handle mount.
- Once your flat stick is tightened your 4 armored Hex bolts and finger tighten your handle mount.
- Find the comfortable position of your flat stick and tighten all 8 of your Hex bolts.
- Using your pry tool remove the retainer on the bottom of your leather boot.
- Once your handle is removed fold your boot inside out and carefully wiggle your boot down our flat stick. When the boot is in place take the zip tie and fasten the boot inside the grove of your flat stick.
- Now carefully folding your boot in place secure the boot to the console.
- Take your 19mm wrench and lock your ball in place.
Take it for a test drive and if you experience excessive road and or gear noise see note from Barton at top of post regarding how to adjust the rear bracket.
-


It looks good Dana! We should race!
It looks good Dana, we should race!